Posts

Showing posts with the label tips

Eriba Caravan Feet

Image
  One design 'quirk' of the Eriba caravans pre-2010 is the footplate on the corner steadies. It's a flat, square foot with turned ends. Perfectly capable for steadying the van, but really not big enough for use on soft ground where the foot can sink into the ground. This problem is easily overcome by using wood or some other sheet under the foot to spread the weight. In other caravans, a larger foot is available which fits with a single pin through the centre. The flat design of the Eriba foot necessitates a double pin arrangement, i.e.one at each end of the foot for attachment. These 2 pin feet were available a few years back, but now seem to be obsolete. I thought about this, the solution, and ordered a set to modify for use on my Eriba. I ordered a set of the Maypole feet. Just under £10 and certainly looked good quality. To match the Eriba foot plate, I drilled 4 holes in each foot, passing through a cable tie. The cable ties are for attaching both the front and rear of...

Brush Seal on a Locker Door

Image
  On the Eriba caravans I've owned, there is a soft brush type 'seal' around the gas locker and entrance doors. I say 'seal' but they are probably more of a draught excluder than a seal and in the case of my 2008 Triton, it bearly fills the gap between the actual door and the frame. One thing I have noticed is that often the brush along the base of the door absorbs water after towing or rain and can take ages to dry out. I've routinely dry the brush with a rag when I'm cleaning the van. On my recently acquired Triton, I noticed that the brush had been removed along the entire bottom of the locker door, probably an attempt to avoid this absorption problem. Sounds a good idea, but unfortunately this meant that the channel for the brush snags very slightly on the frame, making the opening a bit of a faff. On all the other Eriba caravans I've had, there has definitely been a seal around the entire door, so to save the snagging, I set about finding a length o...

Some minor Spring, before touring maintenance

Image
  After towing the van from it's winter storage in a garage, I always conduct a bit of routing lubrication on the caravan. Nothing more than the obvious points which need a little bit of care and attention. I started with the normal lubrication essentials, my grease gun with a loaded cartridge, a tub of medium grease, some 3 in 1 oil, and a can of aerosol WD40. Using the guidance from the hitch maker, Alko, I give a quick dribble of 3 in 1 to the moving parts and the springs. Another point of lubrication is the hinge bolt on the jockey wheel clamp. I used a good squirt of 3 in 1 oil.  Gave the jockey wheel clamp a good dose of 3 in 1. This is one area that definitely benefits from some extra lubrication, especially on the threads of the clamp bar. On the hitch on my van, there are two grease nipples with small rubber caps, one near the hitch and the other by the jockey wheel clamp. I give both these a good couple of strokes from a grease gun loaded with general purpose grease....

Replacing the Door Shelves

Image
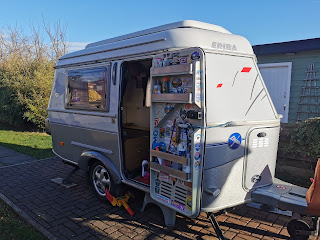
  With the weather being really nice today, and with the prospect of touring again in the next wee while, I took the caravan out of the garage where it was being stored and returned it to my drive. I really didn't have any projects for the van over the winter, unlike last year when I completely re-upholstered and redone the internal decor like curtains, carpet, door facia's and the likes. Like my 3 previous Eriba Caravans, I've had trouble with the original plastic door shelves and decided to order an improved aluminium set from Darren at Eribastuff. I've ordered other odds and ends from Darren over the years and everything has always been top quality. He's an enthusiastic Eriba Puck owner himself, a Scot based in France. The original door configuration above, plastic shelves (or rather shelf fronts?) which turn the Eriba door into effectively a very useful storage area, just like a fridge door! I purchased the van 'set' which comprises one with an 'Erib...

Eriba Troll 'flip out' table modification

Image
When I wrote my review about my experiences with my Eriba Troll , I described my mistrust of the small, fold out table extension. This is how I have fixed mine. The existing hinge and strap security on the table is useless. Even slightly brushing against the table lifts it slightly, the hinge disconnects, and the table folds down. Anything on the table simply falls to the floor. This has happened to me many times. Someone on Facebook recommended a modification using a slip bolt, and I have used that idea to fix my table. I fitted a short slip bolt, the idea being that the extended bolt prevents the hinge from falling from the slot used to support the table. I replaced the fabric webbing as I found that the existing webbing was too short to accommodate the hinge and the bolt, preventing the table being folded away. To close, slip the bolt shut, lift the table, and the hinge is caught in the webbing. It 'parks' as good as the original arrangement. Have trie...

Storage Solutions

Image
One limitation with the Eriba Caravan is the very limited storage space. There are lots of roof lockers for odds and ends, food and gadgets, but they are quite small and not very deep. For clothing, there is a single 'half height' wardrobe above the heater. It's a good size for hanging jackets and the likes, but there is no shelving for other items of clothing. My normal routine is to fold my clothes on the floor of the wardrobe, but it soon becomes a heap with the movement on the road, or the raking around for clothes. I noticed a hanging storage 'shelf' which looked ideal. Works perfect! Still leaves room for hanging jackets and a space below for shoes. Result!

Little dents....

Image
One weakness in the design of the Eriba is it's vulnerability to dents. The aluminium panels are, unlike steel, not very elastic. Minor incidents like stone chips, dropping of poles, or stray wheelie bins often result in small dings. Most Eribas have them. My locker door at the front has a few. A common practice amongst owners is to conceal the dents with stickers. Often vans for sale have strangely positioned stickers which obviously conceal unsightly marks. Thanks to my running brother, I have obtained a few about the right size for the job. Not too shabby!

Waste Water Tank

Image
A peculiar fitting on some Eriba caravans is the onboard 'Grey' water waste tank. Normally only fitted on motorhomes, it captures the waste water from the sink and the wash hand basin and can be emptied over a 'drive over' waste point at sites. I wasn't aware that caravans had these tanks, normally caravanners carry a large portable waste tank which is wheeled and emptied at the waste water point on sites. By having this tank, I don't need to carry the large portable version. However, not all sites are ideal for manoeuvring caravans, especially European vans, over the drain point. On my last trip, I noticed that the tank drain valve was leaking badly when there was waste in the tank. I removed and stripped the valve, and the valve seat was badly pitted and worn. It is a fairly robust screw down valve. On measuring the valve, the thread where it joins the the tank is standard thread 3/4" BSP (which means British Standard Pipe). The tap fitted on g...

Stop/Tail light replacement.

Image
Back home and the first of one of the minor repair jobs, the red stop & tail light replacement on my Eriba 320GT. When I hook up and am ready to leave, I try the indicators, the buzzer identifying that the indicators are operating. I then put on the lights and through the wing mirror, I can see the high and low lamps on the front of the van are working. Occasionally, I go out and check the tail lights. I did notice an intermittent problem with the drivers side tail light. Taking the lamp off, simple 2 screw job, I could 'reseat' the bulb and get it working. The bayonet section which holds the bulb was broken and had been repaired with some insulating tape. With my inexperience, I was worried this was going to be an original Hymer/Eriba part ($$$), but fortunately after searching eBay, it's a generic 95mm Jokon Stop/Tail Lamp. Not too bad at £17 for the complete assembly (including bulb!), and takes 5 mins to fit. Very happy!

Eriba Kitchen Tips

Image
I've learnt a few things about kitchen logistics since living in this van. My electrical apparatus consists of a Tesco Value 2 slice toaster, same brand cordless kettle, and my Remoska. Along with the 3 ring gas hob, this seems to meet my needs entirely. As you can see above, the kettle and toaster fit under the window, of the worksurface, when not in use, and the Remoska fits in the space on the left hand side, in front of the toilet compartment. The little angled 'wall' is ideal for my cross stitch of the van and the mutts, and a handy place to mount all my site 'plaques'. Anorak or what! Tip 1: When you boil the kettle in the morning, fill you mug, then keep the remaining hot water for use throughout the day. A good flask like my Thermos, keeps it boiling all day. Tip 2: Get a flexi bucket instead of a basin. Deep enough to hold all the dishes, and handy for carrying to the dishwashing area. Also, great for carting clothes back and forward to the...